Monday, 30 January 2012

Baby Buzzy Bee


I got this pattern from http://crafty-anna.blogspot.com/. So go to her blog to get more cool patterns just like this.
Materials:- Crochet hook E4 / 3.5 mm
- Worsted weight acrylic yarn in yellow, black and white
- Polyester fiberfill
- 6mm black safety eyes
- Yarn needle
- Sewing needle
- Black pipe cleaner

Bee: With yellow yarnRnd 1: 6 sc into a double loop start and pull the loop closed (6).
Rnd 2: 2 sc in each sc around (12).
Rnd 3: [Sc in next 3 sc, 2 sc in next sc] 3 times (15).
Rnd 4: [Sc in next 4 sc, 2 sc in next sc] 3 times (18).
Rnd 5: [Sc in next 5 sc, 2 sc in next sc] 3 times (21).
Rnd 6: [Sc in next 6 sc, 2 sc in next sc] 3 times (24).
Switch to black yarn
Rnds 7-8: sc in each sc around (24).
Pause to attach eyes between Rnds 3 and 4.
Using a length of black yarn split down to 2 ply and a sewing needle, stitch mouth onto Rnd 1.
To make antennea, cut a black pipe cleaner in half. Cut a length of black yarn and tie and knot it around the center of a piece of black pipe cleaner a few times. This will create a little ball at the tip of the antennea. Bend the pipe cleaner in half and insert the ends into the bee's head between Rnds 5 and 6. Leave about 1"-1.5" of the antennea sticking out of the bee's head. With the pipe cleaner that is inside the bee's body, bend the two pieces at a 90 degree angle to anchor the antennea in place. For added strength, you may want to stitch the pipe cleaner "tails" to the bee's body using a length of yellow yarn. Repeat with other half of the pipe cleaner for the other antennea.
Switch to yellow yarn
Rnds 9-10: sc in each sc around (24).
Switch to black yarn
Rnd 11: sc in each sc around (24).
Rnd 12: [sc in next 2 sc, sc2tog] 6 times (18).
Switch to yellow yarn
Rnd 13: sc in each sc around (18). Stuff.
Rnd 14: [sc in next sc, sc2tog] 6 times (12).
Switch to black yarn
Rnd 15: [sc in next 2 sc, sc2tog] 3 times (9).
Rnd 16: [sc in next sc, sc2tog] 3 times (6).
Finish off leaving a 6" tail. Weave tail through remaining 6 sc and pull up firmly to close the hole. Weave in ends.
Wings: With white yarnRnd 1: 6 sc into an adjustable ring and pull the ring closed.
Rnd 2: 2 sc in next sc, 2 hdc in next sc, 2dc in next 2 sc, 2 hdc in next sc, 2 sc in next sc (12).
Rnd 3: [sc in next st, 2 sc in next st] 2 times, hdc in next st, 2 dc in next st, dc in next st, dc and hdc in next st, [sc in next st, 2 sc in next st] 2 times (18).
Finish off leaving a tail for sewing. Sew wings to bee. Weave in ends.

Friday, 27 January 2012

Moss Stitch

This pattern is very easy perfect for beginner's.

Row 1: k1, p1 all the way across.

Row 2: k1, p1 all the way across.

Row 3: p1, k1 all the way across.

Row 4: p1, k1 all the way across.

Now repeat rows 1-4 to get the pattern.

Monday, 23 January 2012

Leg Warmers


 I got this pattern from http://www.knitting-crochet.com/
I hope you like it even if the picture is in black and white. Don't let that make you think that leg warmers are totally cool and they keep your legs warm.

Row 1: Sc in each ch, join with sl st in top of ch-2, ch 2, do not turn.

Rows 2 through 8: Repeat Row 1.

Row 9: With larger hook, ch 2, hdc in each sc across, join with sl st in top of ch-2, ch 2, turn.

Repeat Row 9 to length desired, after last sl st, fasten off

Happy Colored Pencils


I got this pattern from http://crafty-anna.blogspot.com/. Go to her site she has much more funny crochet items that are simple to make


Materials:
- crochet hook size E/4 - 3.5 mm
- worsted weight acrylic yarn in pink, light grey, hot pink, red, orange, yellow, green, turquoise, blue, purple and beige
- black embroidery floss or black yarn split down to 2 ply
- stuffing
- needle
- 6mm black safety eyes


Rnd 1: 6 sc into an adjustable ring and pull the ring closed(6).

Rnd 2: 2 sc in each sc around (12).

Rnd 3: [sc in next sc, 2sc in next sc] 6 times (18).

Rnd 4: working in back loops only, sc in each sc around (18).

Rnds 5-7: sc in each sc around (18).
Switch to light grey yarn

Rnd 8: sc in each sc around (18).

Rnd 9: working in back loops only, sc in each sc around (18).
Switch to hot pink, red, orange, yellow, green, turquoise, blue or purple yarn

Rnd 10: working in back loops only, sc in each sc around (18).

Rnds 11-18: sc in each sc around (18).
Pause crocheting to attach safety eyes and stitch on mouth using black yarn.
Switch to beige yarn

Rnd 19: sc in each sc around (18).

Rnd 20: [sc in next sc, s2ctog] 6 times (12). Stuff pencil and continue to stuff as you work from now on.

Rnd 21: sc in each sc around (12).

Rnd 22: [sc in next 2 sc, sc2tog] 3 times(9).
Switch to hot pink, red, orange, yellow, green, turquoise, blue or purple yarn

Rnd 23: [sc in next sc, sc2tog] 3 times (6).

Rnd 24: [sc2tog] 3 times (3).
Finish off leaving a 6" tail. Weave tail through remaining 6 sc and pull up firmly to close the hole. Weave in ends.

Saturday, 21 January 2012

Huney Pot and Wooden Dipper


I got this pattern from http://crafty-anna.blogspot.com/ so go see her site if you like this pattern as much as I do.

Materials:
Crochet hook size E/4
Worsted weight acrylic yarn in tan, yellow and black
Tapestry / yarn needle
Polyester stuffing
White felt
DMC/embroidery floss in black and white
Sewing needle
* Optional – pinking shears for crinkled edge around label.

You’ll need to know how to do these stitches:
Chain (ch)
Double loop start
Single crochet (sc)
Single crochet together/ decrease

Honey Pot
Outer shell: with yellow yarn
Rnd 1: 6 sc into a double loop start and pull the loop closed (6).
Rnd 2: 2 sc in each sc around (12).
Rnd 3: [Sc in next sc, 2 sc in next sc] 6 times (18).
Rnd 4: [Sc in next 2 sc, 2 sc in next sc] 6 times (24).
Rnd 5: [Sc in next 3 sc, 2 sc in next sc] 6 times (30).
Rnd 6: [Sc in next 4 sc, 2 sc in next sc] 6 times (36).
Rnd 7: working in back loops only, [Sc in next 5 sc, 2 sc in next sc] 6 times (42).
Rnds 8-16: sc in each sc around (42).
Rnd 17: [Sc in next 5 sc, sc2tog] 6 times (36).
Rnd 18: sc in each sc around (36).
Rnd 19: sl st in each sc around (36).
Finish off.

Inner shell:
Rnd 1: 6 sc into a double loop start and pull the loop closed (6).
Rnd 2: 2 sc in each sc around (12).
Rnd 3: [Sc in next sc, 2 sc in next sc] 6 times (18).
Rnd 4: [Sc in next 2 sc, 2 sc in next sc] 6 times (24).
Rnd 5: [Sc in next 3 sc, 2 sc in next sc] 6 times (30).
Rnd 6: [1 sc in next 2 sc, 2 sc in next sc] 10 times (40).
Rnds 7-13: sc in each sc around (40).
Rnd 14: [1 sc in next 2 sc, sc2tog] 10 times (30).
Finish off leaving a 12" tail for sewing.

Label:
Cut a piece of white felt that is approximately 3” by 2” (I used pinking shears to get the crinkled edge). Using black DMC/embroidery floss and a sewing needle, stitch the word “Honey” onto the felt as shown in the picture. Stitch the label onto the outer shell using a 12” length of white DMC/embroidery floss and a sewing needle.

Insert inner shell into outer shell. Using a length of yellow yarn and a yarn/tapestry needle, tack the bottom center of the inner shell to the bottom center of the outer shell. Using the tail you finished the inner shell with and a tapestry needle, sew Rnd 14 of inner shell to Rnd 17 of outer shell. Weave in ends.

Lid: With black yarn
Rnd 1: 6 sc into a double loop start and pull the loop closed (6).
Rnd 2: 2 sc in each sc around (12).
Rnd 3: [Sc in next sc, 2 sc in next sc] 6 times (18).
Rnd 4: [Sc in next 2 sc, 2 sc in next sc] 6 times (24).
Rnd 5: [Sc in next 3 sc, 2 sc in next sc] 6 times (30).
Rnd 6: [Sc in next 4 sc, 2 sc in next sc] 6 times (36).
Rnd 7: [Sc in next 5 sc, 2 sc in next sc] 6 times (42).
Rnd 8: sl st in each sc around (42).


Knob: With black yarn
Rnd 1: 6 sc into a double loop start and pull the loop closed (6).
Rnd 2: [1 sc in next sc, 2 sc in next sc] 3 times (9).
Rnd 3: [1 sc in next sc, sc2tog] 3 times (6).
Finish off leaving a 12" tail. Weave tail through remaining 6 sts and pull up firmly to close hole. Sew to top center of lid. Weave in ends.

Lip: With black yarn
ch 30, join to first ch with a sl st to form a loop.
Sc in each ch around.
Finish off leaving a 12" tail for sewing.
Sew top edge of lip around the underside of lid at Rnd 5. This will create a “lip” that will extend approx ½” from the bottom of the lid that will fit inside the honey pot when the lid is put on the pot.

End cap: With black yarn
Rnd 1: 6 sc into a double loop start and pull the loop closed (6).
Rnd 2: 2 sc in each sc around (12).
Rnd 3: [Sc in next sc, 2 sc in next sc] 6 times (18).
Rnd 4: [Sc in next 2 sc, 2 sc in next sc] 6 times (24).
Rnd 5: [Sc in next 3 sc, 2 sc in next sc] 6 times (30).
Finish off leaving a 12" tail for sewing. Sew cap to lip about 3/4 of the way around, stuff lightly with polyfil and continue to sew closed. Weave in ends.

Dripper: With tan yarn
Rnd 1: 6 sc into a double loop start and pull the loop closed (6).
Rnd 2: 2 sc in each sc around (12).
Rnd 3: [Sc in next sc, 2 sc in next sc] 6 times (18).
Rnd 4: Sc in each sc around (18).
Rnd 5: [Sc in next 5 sc, 2 sc in next sc] 3 times (21).
Rnd 6: [Sc in next 5 sc, sc2tog] 3 times (18).
Rnd 7: Sc in each sc around (18).
Rnd 8: [Sc in next sc, sc2tog] 6 times (12).
Rnd 9: Sc in each sc around (12). Stuff.
Rnd 10: [sc2tog] 6 times (6).
Rnds 11-22: Sc in each sc around (6).
Finish off leaving a 6” tail. Stuff handle. Weave tail through remaining 6 sts and pull up firmly to close hole. Weave in ends.

Two Great Sites

   Yesterday a friend told me about these great sites were you can find free patterns. Will when I was at home I went to go see for myself and lucky me I found them and she was right. The first site is for Knitting patterns. It's called Knitting Pattern Central.com. Now the next one I really don't need to tell you because you have prabable already guesses, but any way it's for crocheting. Now the site name I think you already now, but I'll still tell you Crochet Pattern Central.com. So if your looking for more free crochet patterns or free knitting patterns then go check out those sites. I have and I love them.  

Friday, 20 January 2012

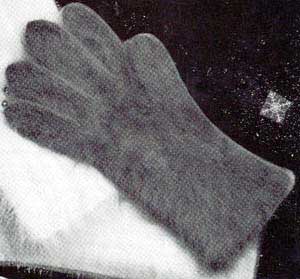
Women's Angora Gloves


I got this glove pattern from Free Vintage knitting so if you like vintage things then go there to find more free knitting patterns.
Medium Size

MATERIALS: Fleisher’s or Bucilla Imported Featherlite French Angora, 3, 10 gram balls.
“Boye” Sock Needles, 1 set Size 1.

GAUGE: 17 sts = 2 inches

RIGHT GLOVE: Cast on 56 sts; divide on 3 needles, join. K 5 rounds even. P 1 round for turning ridge. K even until 2 ins. from turning ridge, mark end of rounds.

Hand: First inc. round: Inc. 1 st in first st, k 1, inc. 1 st in next st (5 sts in thumb gore), k to end of round. K 3 rounds even.

2nd inc. round: Inc. 1 st in first st, k 3, inc. 1 st in next st, k to end of round. Continue to inc. 1 st each side of thumb gore every 4th round having 2 sts more between incs. after each successive inc. round until 17 sts in thumb gore. K 2 rounds even, end just before first thumb st. Slip next 17 sts to a strand of yarn for thumb. Cast on 6 sts, mark for end of round; 59 sts. K 1 ½ ins. even.

First Finger: Slip first 43 sts of next round to a thread to be held for next 3 fingers; cast on 5 sts for gusset. Divide these 21 sts on 3 needles, join. K around for 2 ¼ ins.

First dec. round: K 2 tog., k to end of round; 20 sts. K 1 round even.

2nd dec. round: * K 3, k 2 tog.; repeat from * to end of round; 16 sts. K 1 round.

3rd dec. round: * K 2, k 2 tog.; repeat from * to end of round; 12 sts. K 1 round.

4th dec. round: K 2 tog. 6 times; break off leaving an end. Draw end through all 6 sts; fasten off.

Second Finger: Slip 7 sts from thread on back of hand to needle, pick up and k 5 sts on the 5 sts of gusset, k 7 sts from palm of hand to needle, cast on 4 sts for gusset. Divide these 23 sts on 3 needles, join. K around for 2 ½ ins.

First dec. round: Dec. 3 sts evenly spaced around; 20 sts. K 1 round. Finish same as first finger.

Third Finger: Slip 7 sts from back of hand to needle, pick up and k 4 sts on the 4 cast-on sts of 2nd finger, k 7 sts from palm of hand to needle, cast on 3 sts for gusset. Divide these 21 sts on 3 needles, join. K around for 2 ¼ ins. Finish same as first finger.

Fourth Finger: Slip remaining 15 sts to 2 needles, pick up and k 3 sts on the 3 cast-on sts. Divide these 18 sts on 3 needles, join. K around for 1 ¾ ins.

First dec. round: K 2 tog., k 7, k 2 tog., k 7; 16 sts. Work 1 round even. Beg. with 3rd dec. round, finish same as first finger.

Thumb: Slip the 17 thumb sts to 2 needles, pick up and k 8 sts on the 6 cast-on sts. Divide these 25 sts on 3 needles, join. K 2 rounds even.

Next round: K 2 tog. at center of sts picked up. K 1 round even. On next round, dec. 1 st above last dec.; 23 sts. K around until 2 ins. from picked up sts. Finish same as 2nd finger. Turn up hem and sew to wrong side.

LEFT GLOVE: Work same as right glove up to first finger, end k to within 6 sts of end of last round. Slip last 43 sts worked to a thread.

First Finger: K next 16 sts, cast on 5 sts for gusset. Finish left glove to correspond to right.

Mom's Crystal Star Doily

I do not have the picture for this crochet doily, but I can tell you that it was very nice.

Copyright © 2001 by James G. Davis AND Vicki Tillett. I got this pattern from http://pandacrochet.8m.com/ please go to her site to see more free crochet patterns
Materials:
Approx. 75 yds size 10 crochet thread; size 6 (1.8mm) steel hook OR Size Needed for Gauge
.
Gauge:
Rnds 1 & 2 = 1½" across from "corner" to "corner"
.
Finished Size:
Approx. 8¼" in diameter (at widest points) after blocking
.
Special Stitches:
-Beginning Shell (beg shl) - sl st to next ch sp, (ch 3, dc, ch 2, 2 dc) in same ch sp
-Shell (shl) - (2 dc, ch 2, 2 dc) in ch sp indicated
-Shell in Shell (shl in shl) - work Shell in ch-2 sp of next Shell
.
.
NOTE:
RND 4 may cause doily to "cup" slightly, but it will lay flat again once
RNDS 5 & 6 are complete.
.
Begin with ch 6, join with sl st in first ch to form ring.
.
RND 1: ch 3 (counts as first dc, now and throughout), dc in ring, ch 2, (2 dc in ring, ch 2) 5 times, join with sl st in top of beg ch-3.  (12 dc, 6 ch-2 sps)
Note: next 9 Rnds will be joined the same as RND 1.
.
RND 2: beg shl, ch 1, (shl in next ch-2 sp, ch 1) 5 times, join.  (6 shls, 6 ch-1 sps)
.
RND 3: beg shl, ch 3, (shl in shl, ch 3) 5 times, join.  (6 shls, 6 ch-3 sps)
.
RND 4: beg shl, *ch 2, dc in ch-3 sp, ch 2**, shl in shl*, rep from * to * around ending last rep at **, join.  (6 shls, 6 dc, 12 ch-2 sps)
.
RND 5: beg shl, *ch 3, dc in ch-2 sp, dc in dc, dc in ch-2 sp, ch 3**, shl in shl*, rep from * to * around ending last rep at **, join.  (6 shls, 12 ch-3 sps, 18 dc)
.
RND 6: beg shl, *ch 3, 2 dc in ch-3 sp, dc in dc, ch 1, sk next dc, dc in next dc, 2 dc in ch-3 sp, ch 3**, shl in shl*, rep from * to * around ending last rep at **, join.  (6 shls, 6 ch-1 sps, 12 ch-3 sps, 36 dc)
.
RND 7: beg shl, *ch 3, 2 dc in ch-3 sp, dc in dc, ch 2, sk next 2 dc, dc in ch-1 sp, ch 2, sk next 2 dc, dc in next dc, 2 dc in ch-3 sp, ch 3**, shl in shl*, rep from * to * around ending last rep at **, join.  (6 shls, 12 ch-2 sps, 12 ch-3 sps, 42 dc)
.
RND 8: beg shl, *ch 3, 2 dc in ch-3 sp, dc in dc, ch 3, sk next 2 dc, dc in ch-2 sp, dc in dc, dc in ch-2 sp, ch 3, sk next 2 dc, dc in next dc, 2 dc in ch-3 sp, ch 3**, shl in shl*, rep from * to * around ending last rep at **, join.  (6 shls, 24 ch-3 sps, 54 dc)
.
RND 9: beg shl, *ch 3, 2 dc in ch-3 sp, dc in dc, ch 3, sk next 2 dc, dc in ch-3 sp, dc in next 3 dc, dc in ch-3 sp, ch 3, sk next 2 dc, dc in next dc, 2 dc in ch-3 sp, ch 3**, shl in shl*, rep from * to * around ending last rep at **, join.  (6 shls, 24 ch-3 sps, 66 dc)
.
RND 10: sl st in next dc and into ch-2 sp, (ch 3, dc, ch 3, 2 dc) in same sp beg Corner made), *ch 3, 2 dc in ch-3 sp, dc in dc, ch 3, sk next 2 dc, dc in ch-3 sp, dc in next 5 dc, dc in ch-3 sp, ch 3, sk next 2 dc, dc in next dc, 2 dc in ch-3 sp, ch 3**, (2 dc, ch 3, 2 dc) in next shl (Corner made)*, rep from * to * around ending last rep at **, join.  (30 ch-3 sps, 102 dc)  Do Not Fasten Off.  Continue with Rnd 11 below.

Special Stitch:
-Decrease (dec) - yo, (insert hook in next dc, draw up loop) 2 times, yo and draw through 3 loops, yo and draw through last 2 loops (counts as 1 dc)
.
NOTE:
Rnds 13 & 14 may tend to cause doily to "cup" slightly, but it will lay flat again when Rnd 15 is complete.
.
RND 11: sl st in next dc and into corner ch-3 sp, ch 3 (counts as first dc), 5 dc in same sp, *ch 3, skip next ch-3 sp and next 2 dc, dc in next dc, 2 dc in ch-3 sp, ch 3, sk next dc, dc in next 2 dc, dec, dc in next 2 dc, ch 3, 2 dc in ch-3 space, dc in next dc, ch 3, skip next 2 dc and ch-3 space**, 6 dc in corner ch-3 sp*, rep from * to * around ending last rep at **, join with sl st in top of beg ch-3. (102 dc, 24 ch-3 sps)
.
RND 12: sl st in next dc, ch 3 (counts as first dc), dc in same dc, 2dc in each of next 4 dc, *ch 3, sk next ch-3 sp and next 2 dc, dc in next dc, 2 dc in next ch-3 sp, ch 3, sk next dc, dc in next dc, dec, dc in next dc, ch 3, 2 dc in ch-3 sp, dc in next dc, ch 3, sk next 2 dc and ch-3 sp and next dc**, 2 dc in each of next 5 dc*, rep from * to * around ending last rep at **, join with sl st in top of beg ch-3. (114 dc, 24 ch-3 sps)
.
RND 13: sl st in next dc, ch 4 (counts as first dc and 1 ch), (dc in next dc, ch 1) 7 times, dc in next dc, *ch 3, sk ch-3 sp and next 2 dc, dc in next dc, 2 dc in ch-3 sp, ch 3, sk next dc, dec, ch 3, 2 dc in ch-3 sp, dc in next dc, ch 3, sk next 2 dc and ch-3 sp and next dc**, (dc in next dc, ch 1) 8 times, dc in next dc*, rep from * to * around ending last rep at **, join with sl st in 3rd ch of beg ch-4. (96 dc, 24 ch-3 sps, 48 ch-1 sps)
.
RND 14: sl st into ch-1 sp, ch 5 (counts as first dc and 2 ch), (dc in next ch-1 sp, ch 2) 6 times, dc in next ch-1 sp, *ch 3, sk ch-3 sp and next 2 dc, dc in next dc, 2 dc in ch-3 sp, ch 3, 2 dc in next ch-3 sp, dc in next dc, ch 3, skip next 2 dc and ch-3 sp**, dc in next ch-1 sp, (ch 2, dc in next ch-1 sp) 7 times*, rep from * to * around ending last rep at **, join with sl st in 3rd ch of beg ch-5. (84 dc, 18 ch-3 sps, 42 ch-2 sps)
.
RND 15: sl st into ch-2 sp, ch 1, *[(sc, 2 dc, sc) in ch-2 sp] 7 times, 3 sc in ch-3 sp, sc in each of next 3 dc, ch 1, 3 dc in ch-3 sp, ch 1, sc in each of next 3 dc, 3 sc in ch-3 sp*, rep from * to * around, join with sl st in top of first sc. (156 sc, 102 dc)  Fasten Off.  Weave in ends.
.

Thursday, 19 January 2012

The Day of Love


   Now even though here in Saskatoon we are having below -40c the time of love is almost here. So to make a card or and box of chocolate extra special for the one you love why not make things to welcome the day of love.  
I got this chart from About.com, cross stitch.

Friday, 13 January 2012

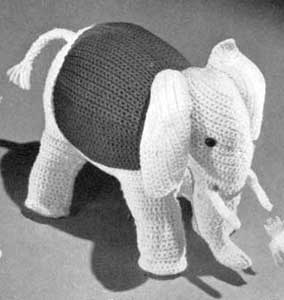
Cute Grey Elephant

 I got this cute toy elephant pattern from Free Vintage Crochet. this pattern was originally found published by The American Thread Company, Book No. 6-E.

MATERIALS REQUIRED
-American Thread Company "Dawn" or
-"Clover Leaf" Germantown Wool
-7 – ½ oz. Balls White
-2 – ½ oz. Balls Scarlet
-Bone Crochet Hook #2.
-The elephant may also be made in "Dawn" Knitting Worsted.

The entire Elephant is worked in s c.
Ch 14 for front leg, work 13 s c on ch and work 8 more rows even.

10th Row: Increase 1 st at end of row and work 1 row even.
Repeat the last 2 rows.

14th Row: Repeat 10th row and work 3 rows even.

18th Row: 1 s c in each s c, ch 30, turn and work 29 s c on ch and 1 s c in each s c.

20th Row: Increase 1 st at end of row and work 3 rows even.

24th Row: Increase 1 st at end of row.

25th Row: 1 s c in each of the first 15 s c, turn and work 5 rows on 15 s c even.

31st Row: Decrease 1 st at beginning of row and work 1 row even. Repeat the last 2 rows 4 times.

41st Row: Decrease 1 st at beginning of row.

42nd Row: Decrease 1 st at end of row. Repeat the last 2 rows, break yarn, and work another section.

HIND LEG: Join yarn in 1st s c and work 1 s c in 1st 14 s c, 2 s c in next s c, ch 1, turn and work 2 rows even.

4th Row: Decrease 1 st at beginning of row and work 1 row even. Repeat the last 2 rows.

8th Row: Decrease 1 st at beginning of row and work 10 rows even, break yarn and work another section.

HEAD: Join yarn in 1st s c in front leg and work 1 s c in each of the 1st 8 s c, ch 1, turn.

2nd Row: 1 s c in each s c, ch 20, turn.

3rd Row: 19 s c on ch, 1 s c in each s c and work 9 rows even.

13th Row: Decrease 1 st at beginning of row and work 1 row even. Repeat the last 2 rows 5 times.

25th Row: Decrease 1 st at beginning of row.

26th to 31st Row: Decrease 1 st at the beginning and end of each row, break yarn.

TRUNK: Join wool in 1st s c at lower part of head and work 1 s c in each of the 1st 14 s c, ch 1, turn.

2nd Row: 1 s c in each s c.

3rd Row: Decrease 1 st at the beginning of row and work 1 row even. Repeat the last 2 rows 5 times.

15th to 18th Row: Decrease 1 st at beginning of row.

19th, 21st, 23rd Rows: Increase 1 st at beginning of row.

20th, 22nd & 24th Rows: Decrease 1 st at beginning of row and work 1 row even.

26th Row: Decrease 1 st at the beginning of row and work 4 rows even. Work 1 row of s c across front of trunk, working 1 s c in every other row.
This shapes the trunk, break yarn and work other half to correspond.

SADDLE: Join Scarlet in 1st free s c next to head, turn, sl st into 1st row of head, turn, s c in st with joining, 1 s c in each s c across back, sl st into side of next row, turn, s c in each s c, sl st into side of work and continue working back and forth, working 2 rows of s c in Scarlet for each row of White until all rows of White have been worked up, break yarn and repeat for other side.
Work 2 sections following the first 23 rows given and work hind leg following directions given for hind leg.

FEET: Ch 2, 7 s c in first ch.

2nd & 3rd Rows: 2 s c in each s c and work 1 row even, break yarn and work 3 more feet.

EAR. Ch 21, 20 s c on ch.

2nd to 7th Rows. Increase at the beginning of row.

8th Row. Increase at end of row.

9th Row. 1 s c in each of the 1st 9 s c, sl st in each of the next 3 s c, ch 1, turn.

10th Row. Sl st in each sl st and s c in each s c.

11th Row. 1 s c in each s c, 1 s c in each sl st, then sl st over next 3 sts, ch 1, turn.

12th Row. Sl st in each sl st and s c in each s c.

13th Row. Same as 11th Row.

14th Row. Same as 12th Row.

15th Row. 1 s c in each st across entire row.

16th Row. Increase at end of row and work a row of s c across long side of ear, break yarn and work other ear to correspond.

TAIL. Ch 6, join, ch 1 and work 1 s c in each st, continue work until tail measures 3 ½ inches, then draw up loop on hook about 1 ½ inches long, * 1 s c in next s c, draw up a loop, repeat from * all around.
Break yarn and trim edge.

TUSKS. Ch 4, join, work same as tail until work measures 3 inches, break yarn, leaving 8 inch end, thread needle and drawn yarn through tusk and back again, drawing it up slightly to shape.
Sew sections together, leaving an opening at the bottom for filling.
Set in the section for feet, fill and sew up. Attach ears, tail and tusks. Embroider the eyes in Tan with Brown French Knot in the center.
The elephant may also be made in "Dawn" Knitting Worsted.

Wednesday, 4 January 2012

Starting Again

    Okay it's Jan 4, 2012, and today is the first day back at school. Yes I know you probably didn't know that I was still in school well if you want to know. I am not that little I have two more years of high School and then I am out in the real world. Not that I am not in the real world now, but I guess that is just what people say when they are done with school and have to go work. Me I'm working for one or two years and then hopefully I will have enough money so I can go to University.  
    Now I know, what is a teenager doing writing a blog about knitting, cross stitch, and crochet. Well I guess the reason I made this blog was because I could never really find free patterns online and so I decided to make a blog where people could come and find all kinds of "old lady" crafts (well as most people call them).  

Tuesday, 3 January 2012

Hello, New Year

Well a New Year has begun. I hope that many of you are starting those New Year projects or your adding more projects to your “to do” list. Well it’s a new year so more birthdays and special events will be coming up so I hope that list of yours goes down some. If you have no projects and you need to find one for someone’s birthday or a baby shower then come look at my site and see if you can find anything that might be just right for that special person.