Friday 23 December 2011

Double Moss Diamond in a Rib


For this pattern to work you need 13 or double that stitches.

Row 1: k1, p1, k1, p7, k1, p1,k1
Row 2: k1, p1, k1, p7, k1, p1, k1
Row 3: k1, p1, k1, p3, k1, p3, k1, p1, k1
Row 4: k1, p1, k1, p3, k1, p3, k1, p1, k1
Row 5: k1, p1, k1, p2, k1, p1, k1, p2, k1, p1, k1
Row 6: k1, p1, k1, p2, k1, p1, k1, p2, k1, p1, k1
Row 7: k1, p1, k1, p1, k1, p1, k1, p1, k1, p1, k1, p1, k1
Row 8: k1, p1, k1, p1, k1, p1, k1, p1, k1, p1, k1, p1, k1
Row 9: k1, p1, k1, p2, k1, p1, k1, p2, k1, p1, k1
Row 10: k1, p1, k1, p2, k1, p1, k1, p2, k1, p1, k1
Row 11: k1, p1, k1, p3, k1, p3, k1, p1, k1
Row 12: k1, p1, k1, p3, k1, p3, k1, p1, k1

Now I hope that when yopu make this type of stitch that it turns out all right.

Wednesday 21 December 2011

Something New and Fun

If you might have noticed I have added something fun for you. If you look at the side their are pets that you can play with and feed. If you have anything else you want to see on my blog then just leave a comment on one of the posts. I hope you like the change and enjoy the fun of taking care a virtual pet.

Tuesday 20 December 2011

Christmas Ordement

      Well it's Christmas time so if you want to make a card extra specil then why not use this chart. Now I haven't added the colour chart because I thought you could choose your own colours, also I don't have the colouring chart. I hope you enjoy.

Saturday 10 December 2011

It's Christmas Time!

   Well it's that time of year again were you go out and blow your money away. If your look for a way to save some money or don't know what to get someone, well I have the perfect gift. Make something! Yes I know it sounds like a bunch of work and takes up free time, but did you know that most people will like a gift better when it is made from you then from a store. The reason for this is because when you get something homemade you know how much that person cares about you. So come look at my patterns and see if you find something that would make a great gift for someone else.

Saturday 19 November 2011

Bloom Pincushion


This chart I got from "Just CrossStitch" magazine volume 29 issue 2, March/April 2011.


Friday 18 November 2011

Reversible Cable Hat


Materials:
Heavy worsted weight yarn, approx 200 yards (130g)
(I used 2 skeins of Patons SWS in the Natural Pink colorway) Size 8 circular needle, 16 or 24 inches long. (Or size needed for gauge)
Size 8 DPNs (or longer circular for Magic Loop)
Cable needle
Stitch markers

Gauge: 19 stitches and 24 rows in 4 inches over stockingette.
This hat is one size, but given the stretchy nature of ribbing, it will fit most teens and adults. You could reduce the yarn and needle size for a smaller hat.
Directions:Cast on 120 stitches, place stitch marker, and join in the round.
Round 1: *K2, P2* around
Rounds 2-5: Repeat Rnd 1
Round 6: *K2, P2, C8F* repeat around.
Repeat rounds 1-6 two times more. Piece should measure approx 3 inches long.
*KEY*C8F: Slip 4 sts to a cable needle and hold to front, K2, P2, then K2, P2 from the cable needle.
Continue in K2, P2 rib pattern (no more cables) until piece measures 8 inches long from cast on.
Next round: [K2, P2] for 20 sts, place marker. Repeat around. 6 stitch markers total.
(Note: It is wise to make the first stitch marker a different color than the rest to distinguish the beginning of the round.)
Begin decreases:
Round 1: *K2tog, P2, [K2, P2] to next stitch marker, slip marker*. Repeat around.
Round 2: *K1, P2tog, [K2, P2] to next marker, slip marker*. Repeat around.
Round 3: *P2tog, [K2, P2] to next marker, slip marker*. Repeat around.
Round 4: *K2tog, K1, P2, [K2, P2] to next marker, slip marker*. Repeat around.
Repeat rounds 1-4 until there are 8 stitches between stitch markers or 48 stitches total, switching to DPNs, 2 circulars or a Magic Loop when necessary.
Round 5: *K2tog, P2tog, K2, P2, slip marker*. Repeat around.
Round 6: *P2tog, K2tog, P2, slip marker*. Repeat around.
Round 7: *K2tog, P2tog, remove marker*. Repeat around.

Cut yarn leaving a 12" tail. Thread needle and pull yarn through all remaining stitches. Pull snug and weave in tails.

The cables on the brim are reversible so you can wear the hat with the brim folded up or down.


A Reversible Cable Scarf


Materials:
Heavy worsted weight yarn, approx 385 yards (280g)
(I used 5 skeins of Patons SWS in the Natural Pink colorway. I only used portions of 3 of these skeins to keep the striping in sequence.) Size 9 needles, or size recommended for your yarn
Cable needle

Gauge: It's a scarf. Does gauge really matter? Live a little!
Scarf measures approx 64 inches long, and 4.5 inches wide.
Directions:Cast on 40 sts using your favorite cast on method.
Row 1 : (RS) *K2, P2* across
Rows 2, 3 & 4: Repeat Row 1
Row 5: (RS) *K2, P2, C8F* Repeat to last 4 sts, K2, P2
Row 6: Repeat Row 1
Repeat rows 1-6 for desired length, ending with row 4.
Bind off in K2, P2 pattern.
Weave in the ends.
Flip scarf over and over and marvel at it's reversibility!

***KEY*** VERY IMPORTANT for reversible cables!
C8F: Slip 4 sts to a cable needle and hold to front, K2, P2, then K2, P2 from the cable needle.

Want to alter the size of your scarf? To make the scarf wider or narrower, add or subtract 12 stitches to your cast on. This will add or subtract one cable repeat and approximately 1.5" from the width of the scarf.

Rules

Okay now that I have free patterns and people can come and use them I think you need to read the rules first so that you know what you can and can't do when you use my patterns
1. DO NOT sell these chart and patters! They are for you to use and give to others
2. DO NOT take my charts and post them on your blog or other sites
3. DO NOT delete things that I have wrote or/and replace them with bad words, slane, junk
4. If you find anything that is not right, you have some questions, or some commplants then please email me at ivyjade234@gmail.com

Friday 11 November 2011

Post Stitch Mitts


Sizes: M [L]
Hand measured at knuckles 7.5inches [8.5 inches]

Materials:Worsted weight about 2.15 [2.25] ounces
H and I crochet hooks

Gauge: 6 sc = 2 inches. 7 sc rows = 2 inches

Note: Ch 2 and ch 3 at beginning of rounds counts as hdc and dc.

Foundation chain: With I hook, ch 26 [28], join with slip stitch in first chain.

Rnd 1: Ch 2, hdc in each ch, ending slip stitch around ch 2, as if to front post.

Rnd 2-7: Ch 2, *bphdc, around next hdc, fphdc around next hdc*, repeat ending with slip stitch around ch 2, as if to front post. On rnd 7 sl st in ch 2.

Rnd 8-13: Ch 1, sc in same st, sc in each st, join with sl st in first sc. Mitt should measure approximately 4-5 inches from foundation chain.

Rnd 14: Ch 1, sc in same st, sc in next 10 [11] sts, ch 5 [6], skip 5 [6] sc, sc in 10 [10] sc. Join with slip stitch in first sc.

Rnd 15-16: Ch 1, sc in same st, sc in each st and ch, join with sl st in first sc.

Rnd 17: Ch 2, hdc in each st, ending slip stitch around ch 2, as if to front post.

Rnd 18-21: Ch 2, * bphdc around next st, fphdc around next dc, repeat around ending with slip st around ch 2, as if to front post. Should measure approximately 7-8 inches from foundation chain. Mitt should reach to the first joint of the little finger, if it doesn’t add another round of back and front posts.

Optional Thumb:

Using a size H hook

Rnd 1: Join yarn with a sc in the first skipped sc of Rnd 13. Space 12 [14] sc around opening, 1 sc in each of the 5 [6] skipped sts and the unused loop of ch, sc in the sides of the sc in rnd 14.

Rnd 2-3: Ch 2, 5 [6] hdc, 3 sc, 3 [4] hdc, join with slip stitch in top of ch 2.

Rnd 4: Ch 2, 3 [4] hdc, 6 sc, 2 [3] hdc, join with slip stitch in top of ch 2.

Rnd 5: Slip stitch in each st around. Fasten off. Weave in ends.

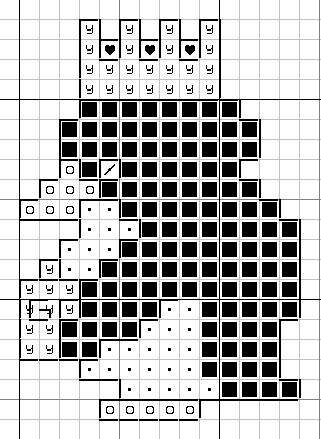
Christmas Card Penguin


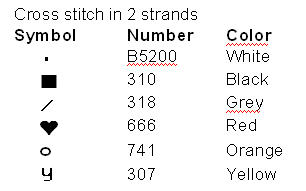
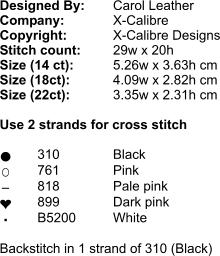
king-penguin-cross-stitch-chart (31K)

 Found this chart at: http://www.needlework-tips-and-techniques.com/christmas-cross-stitch.html#ixzz1dQIg5slC

If you can't tell what this is, then I'll tell you. It's a penguin
king-penguin-cross-stitch-key (11K)

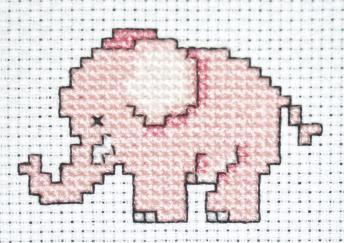
elephant

Finished piece
free-elephant-cross-stitch (21K)


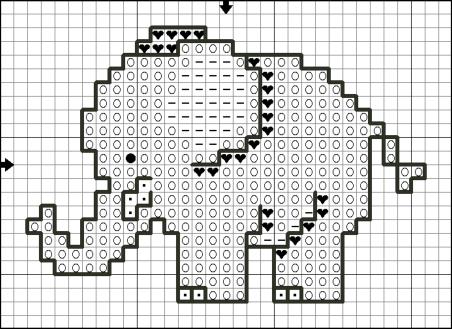
Chart
free-cross-stitch-patterns-elephants (48K)
 

free-cross-stitch-patterns-elephants-key (16K)
It lists the colour there, but you can use any colour and type of cotton strands that you want.

Thursday 10 November 2011

Pink Roses

What to use: White 14 count aida fabric
                     Two strands for each colour
                     Anchor stranded cotton
                     Look at the number code so you can buy the right shade of colour needed

Free Cross Stitch Pattern 2
This chart was founded at: Cross stitch Center

Cupcake Keychain


Hook to Use: 2mm hook for half strands of yarn or smaller for crochet cotton.
3.5mm hook for worsted weight yarn.

Definitions: SC = Single Crochet
                    INVDEC = Invisible Decrease
                    INC = Increase (2 SC in one stitch)

Instructions:

Cupcake Top
CH2 or Magic Ring or however you like to start
1. SC x 6 (6)
2. INC in each ST (12)
3. SC then INC; repeat around (18)
4. SC x 2 then INC; repeat around (24)
5. SC around (repeat for rounds 6 through 9) (24)
10. SC x 2 then INC x 2; repeat around (36)
11. SL ST x 4 then SC x 3 in each of the next two ST (sort of like and increase but put 3 SC in the ST instead of 2); repeat around (72)
Finish off and weave in the tail
Decorate with French Knots or whatever you like.


CupCake Bottom
CH2 or Magic Ring or however you like to start
1. SC x 6 (6)
2. INC in each ST (12)
3. INC x 6 then SC x 6 (18)
4. SL ST around (to form the flat bottom of the cupcake) (18)
Round 5 is done in the backloop only of round 3, leaving the SL ST line totally untouched, you may need to CH 1 to get to it.
5. SC around (18)
6. repeat round 5 for rounds 6 through 13 (18)
Finish off and keep a long tail for attaching to the cupcake top

Cherry
CH2 or Magic Ring or however you like to start
1. SC x 6 (6)
2. INC in each ST (12)
3. INV DEC x 6 (6)
Finish off and keep a long tail to sew into cupcake frosting.

Canadian Pride


Canadian Pride! Knit this for someone and they can use it for Canada Day.
melissasgardenmapleleafknitteddishclothpic.jpg
Directions: Cast on 35 stitches.
Rows 1-6: Garter Stitch (Knit each row) for 6 rows.
Rows 7: (RS) K across all 35 stitches.
Row 8: (WS) K4 then P27, then K4.
Row 9: (RS) K across all 35 stitches.
Row 10: (WS) K4 then P27, then K4.
Row 11: (RS) K4 then K13, P1, K13, then K4
Row 12: (WS) K4 then P27, then K4.
Row 13: K4 then K13, P1, K13, then K4
Row 14: (WS) K4 then P27, then K4.
Row 15: K4 then K13, P1, K13, then K4
Row 16: (WS) K4 then P27, then K4.
Row 17: K4 then K13, P1, K13, then K4
Row 18: (WS) K4 then P27, then K4.
Row 19: K4 then K13, P1, K13, then K4
Row 20: (WS) K4 then P27, then K4.
Row 21: K4 then K7, P13, K7, then K4
Row 22: (WS) K4 then P27, then K4.
Row 23: K4 then K9, P9, K9, then K4
Row 24: (WS) K4 then P27, then K4.
Row 25: K4 then K8, P11, K8, then K4
Row 26: (WS) K4 then P27, then K4.
Row 27: K4 then K6, P15, K6, then K4
Row 28: (WS) K4 then P27, then K4
Row 29: K4 then K4, P19, K4, then K4
Row 30: (WS) K4 then P27, then K4
Row 31: K4 then K5, P17, K5, then K4
Row 32: (WS) K4 then P27, then K4
Row 33: K4 then K3, P6, K1, P7, K1, P6, K3, then K4
Row 34: (WS) K4 then P27, then K4
Row 35: K4 then K5, P2, K3, P7, K3, P2, K5, then K4
Row 36: (WS) K4 then P27, then K4
Row 37: K4 then K4, P1, K5, P7, K5, P1, K4, then K4
Row 38: (WS) K4 then P27, then K4
Row 39: K4 then K9, P9, K9, then K4
Row 40: (WS) K4 then P27, then K4
Row 41: K4 then K9, P2, K1, P3, K1, P2, K9, then K4
Row 42: (WS) K4 then P27, then K4
Row 43: (RS) K4 then K8, P1, K3, P3, K3, P1, K8, then K4
Row 44: (WS) K4 then P27, then K4
Row 45: (RS) K4 then K13, P1, K13, then K4
Row 46: (WS) K4 then P27, then K4
Row 47: (RS) K4 then K13, P1, K13, then K4
Row 48: (WS) K4 then P27, then K4
Row 49: (RS) K across all 35 stitches
Row 50: (WS) K4 then P27, then K4
Rows 51-57: Garter Stitch (Knit all rows) binding off on Row 57.


Garden swan Dishcloth

 
You can make it as a dishcloth, but I think that is too much work to make something that is going to be used to clean things. So a good idea is too make a bunch of them, then sew them all together and you have a quilt.
 
 
melissasgardenswanpic3.jpg
Directions: Cast on 37 stitches.
Rows 1-6: Garter Stitch (Knit each row) for 6 rows.
Rows 7: (RS) K across all 37 stitches.
Row 8: (WS) K4 then P29, then K4.
Row 9: (RS) K across all 37 stitches
Row 10: (WS) K4 then P29, then K4.
Row 11: (RS) K across all 37 stitches
Row 12: (WS) K4 then P29, then K4.
Row 13: K4 then K8, P16, K5, then K4
Row 14: (WS) K4 then P29, then K4.
Row 15: K4 then K7, P18, K4, then K4
Row 16: (WS) K4 then P29, then K4.
Row 17: K4 then K6, P19, K4, then K4
Row 18: (WS) K4 then P29, then K4.
Row 19: K4 then K6, P19, K4, then K4
Row 20: (WS) K4 then P29, then K4.
Row 21: K4 then K6, P19, K4, then K4
Row 22: (WS) K4 then P29, then K4.
Row 23: K4 then K6, P19, K4, then K4
Row 24: (WS) K4 then P29, then K4.
Row 25: K4 then K6, P11, K3, P5, K4, then K4.
Row 26: (WS) K4 then P29, then K4.
Row 27: K4 then K5, P11, K4, P4, K5, then K4
Row 28: (WS) K4 then P29, then K4
Row 29: K4 then K4, P3, K2, P6, K4, P4, K6, then K4
Row 30: (WS) K4 then P29, then K4
Row 31: K4 then K9, P4, K5, P4, K7, then K4
Row 32: (WS) K4 then P29, then K4
Row 33: K4 then K8, P3, K6, P3, K9, then K4
Row 34: (WS) K4 then P29, then K4
Row 35: K4 then K16, P3, K3, P1, K6, then K4
Row 36: (WS) K4 then P29, then K4
Row 37: K4 then K15, P3, K3, P2, K6, then K4
Row 38: (WS) K4 then P29, then K4
Row 39: K4 then K15, P2, K3, P4, K5, then K4
Row 40: (WS) K4 then P29, then K4
Row 41: K4 then K15, P3, K2, P4, K5, then K4
Row 42: (WS) K4 then P29, then K4
Row 43: K4 then K16, P7, K6, then K4
Row 44: (WS) K4 then P29, then K4
Row 45: K4 then K17, P5, K7, then K4
Row 46: (WS) K4 then P29, then K4
Row 47: K37 across
Row 48: (WS) K4 then P29, then K4
Row 49: K37 across
Row 50: (WS) K4 then P29, then K4
Rows 51-57: Garter Stitch (Knit all rows) binding off on Row 57.

Welcome

Hello and welcome to my blog.
This blog is for crafters as you probably already guessed by the name. But it is not just a whole lot of talking about knitting and other things, no this blog will have patterns. Oh yes so know I have your attention. I will get patters for knitting, crocheting, and cross stitching so if your a beginner or a pro you can find all you need for your skill level.